Monday, December 31, 2012

Style Your Ombre Creation!

In an earlier post, I taught you how to create your very on studded ombre shirt.
Now that you have it, you may wonder
"Well, how do I style it?!"
 
This kind of top can be dressed up or down, worn casually or fancilly. If that's a word...
 
The trick is what you wear with it! For example, your accessories, your bottoms, your shoes and your bag! By adding and taking away these items, you can change
the look entirely. So really, you're taking one item and creating
many different styles!
 
STYLE #1: CASUAL
For an easy, everyday look, try opting for some comfortable plain shoes. Here, I chose to pair my ombre denim with some casual converse--these shoes are versatile and extremelystyle-able!
 
Grab a pair of dark wash pants. Since our top is already denim, you may not want to wear additional denim jeans! Unless you feel like you can pull it off that is... like Kanye West
 
 
STYLE #2: FANCY CASUAL
So you want to dress up your denim a bit?
This can be easily done! Just add some jewelry and a skirt, a cute bag and some dressy shoes!
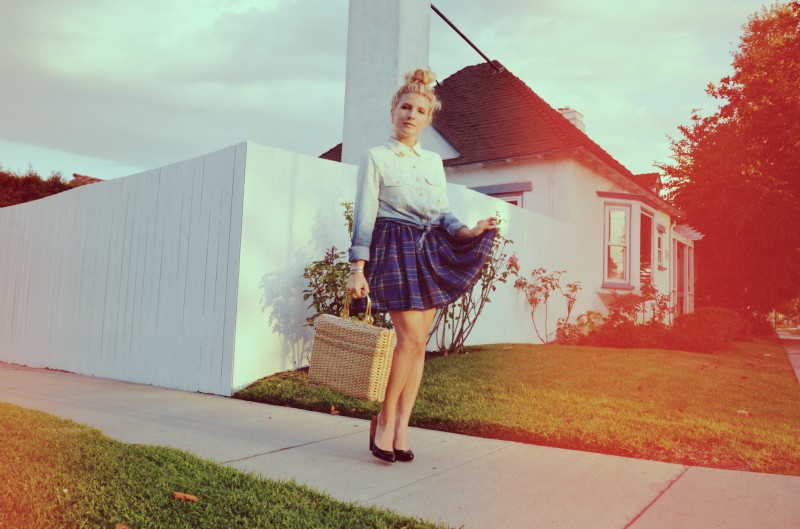
 
As you can see here, the ombre denim top was tucked into a plaid skirt. This instantly adds some glam to the outfit, without dressing it up too much.
 
Opting for a cute pair of wedges instead of heels, the outfit does not look too dressy.
 
With a cute straw bag and some bangles, the outfit was finished off with some class!  
 
This look is dressy yet simple and casual--perfect for a small outting with friends.
 
STYLE #3: CUTE CASUAL
Ombre Denim
Add some ankle booties for a casual and relaxed look.
 
Opt for a cute floral dress or skirt for a cute feminine touch! This adds some softness to your look.
 
Tie up your hair in a cute and casual top knot bun. This not only keeps your hair in place through out the day, but it adds a semi-sophisticated factor to your outfit.
 
Finish off with your denim-ombre button up, worn as a cardigan instead of a shirt.
 
These are just suggestions and ideas. At the end of the day, you can style your top however you like!


ANGELINA JOLIE LIPS WITH HOUSEHOLD PRODUCTS!


Angelina Jolie... known for many things, one of those things being her LIPS!
They keep men staring and women jelaous.
What if I told you that you could acquire them, too?
Without the surgery that is...
 
There are many easy and cheap methods to getting lips like Angelina's,
each being fast and highly convenient. You most likely already have each and
every item needed to obtain lips like Angelina's, so let's get started
 
METHOD #1: toothbrush
As the name suggests, you only need a toothbrush for this method
It could be a new one, or you can use the tooth brush that you already have at hand... it does not make a difference.
 
Step 1 of 1:After brushing your teeth in the morning, quickly take
your toothbrush and scrub your lips in a gentle circular motion.
 
 
This will exfoliate your lips and help give them a boost--the prickly  bristles will gently agitate your lips so that they become more plump
 
This is the quickest, cheapest, and easiest way to enhance your lips.
 
 
METHOD #2: home made lip scrub
Many retailers sell exspensive lip scrubs, but why spend money
when you can make your own with household items?
 
All you need for this method is some sugar (to exfoliate), honey (for smooth lips), olive oil (for moisture) and vaseline (for softness).
 
Step #1) combine the honey, olive oil, vaseline, and sugar for
a cheap and effective lip scrub
 
Step #2) Apply to and use your fingers to gently scrub your lips with the home made mixture
 
Step #3) rinse off the scrub. Your lips should be soft--after this, apply some chapstick to seal in the moisture.
 
The sugar will exfoliate your lips to plump them up and remove dead skin. The honey, olive oil and vaseline will complement eachother to give your lips moisture and softness.
 
 
METHOD #3: Lip Gloss and Liner
When you're short on time, or in need to enhance your lips on the spot, the quickest ways to add some plump to your lips are lipgloss and liner.
 
You'll need to purchase these items, but chances are you already have these items in your makeup collection!
 
STEP #1) Take a natural liner color, and begin to outline your lips. The trick is to line your lips, but slightly go outside of your actual lip. This will make your lips seem larger.
 
Make sure you fill in your lips with this color, or else your lips will look odd.
correct
incorrect (she forgot to fill in!)
 
STEP #2) Take some lip gloss of your choice, and apply it to your lips. For an exaggerated look, apply it all over your lips. For a more relaxed look, apply it only to the center of your top and bottom lip.
All over
Center

What are you waiting for?! Give these methods a try, and remember, the sexiest curves on your body are your lips... so smile!

Nail Tutorial: EASY Large Cheetah Print

After scrolling through some nail posts on several blogs and Instagram pages,
I decided to recreate my own cheetah nail print.
Cheetah nail art can vary from small print (more commonly seen)
to large print. This type of large cheetah print nail caught my attention
and I decided to recreate my own.
 
Small Print
 

Large Print

This tutorial will walk you three a few easy steps, ultimately acheiving the
PERFECT large cheetah print.


Before you start, you want to choose three colors.
-One color for your actual nail
-Another for your dot
-and the last color for the detail around the dot

After choosing your three colors, you might want to make sure
your nails are clean, filed, and prepped for nail polish.
Clean up your cuticles as well, removing any excess skin!

YOU MAY NOW BEGIN:

#1: Paint on your base coat for longer lasting nail polish, 
and also for a smooth canvas


#2: Apply two coats of your base color, allowing time to dry in between. Here I'm using a coral color from Essie


#3: Because the print is larger, apply larger dots. You want to
make the dots imperfect. Here as you can see, my dots vary
in size, length, and width. I'm using a lilac color from Sally Hansen


#4: Imperfectly add the details that surround the dots. This step
is what makes your overall design appear cheetah-like. After outlining your circles, you may add tiny random marks to make it more realistic.


#5: Apply top coat, allow time to dry, and you're done!


Don't limit yourself to just plain solid-colored nails. Be creative, give these nails a try! They're easy, fast, and fun, yet they look like you got them professionally done!


Wednesday, November 28, 2012

THE MOST CRUCIAL FEATURE OF YOUR FACE

EYEBROWS, EYEBROWS, EYEBROWS!
I cannot stress  enough the importance of eyebrows.
 
They frame your face, give you structure, and add proportion to your face if there is none. (Nobody's perfect!)
 
There are two main LAWS of the eyebrow that everyone should abide to:
 
1) Your eyebrows are sisters, not twins!
2) For the second rule, look at the picture below:
 

-Your eyebrow should start adjacent to the side of your nose--in this diagram the #1 line. Take any brush or pencil and place it parallel to the side of the nose as a guideline.
 
-Your eyebrow's arch should be on the imaginary line starting at your nose running through the center of your pupil--in this picture where #2 falls. Again, you can use any straight edge as a guideline.  
 
-Your eyebrow should end on line #3. This is basically the imaginary line from the side of your nose to the end of the eye.
You may use any straight edge to guide.  
 
*Follow these rules when you trim, pluck, thread, or fill in your brows
 
The following are examples of decent eyebrows:
 
The bad, the horrible, the appalling:
No Comment
The Chola Eyebrow
 
Tadpole Eyebrows


Way too thin
It's Like we're playing hangman
 

DIY: $10 STUDDED OMBRE DENIM

 
Go from drab to fab with $10
Project #1

What you'll need:
-Clorox Bleach.................................$1.99 (Wal-Mart)
-Studs.................................................$1.00-3.00 (eBay)
-Any denim shirt...........................$4.95 (Thrift store)
-Aluminum baking tray ..............$1.00 (Dollar store)
 
 
Starting off:
 
1) Pick any (inexpensive) denim shirt. I got mine from the local thriftstore, Goodwill, for $4.95! What a steal, right? Anyways, you can do this on any denim shirts, shorts, long sleeves, jackets... the possibilities are endless and the process is exactly the same.   
 
You might want to pick something you won't regret messing up--just in case! 
$4.95 Denim Button Up

2) Grab any tray, dish or bucket and fill it with 3 parts bleach, 1 part water. Here I am using an aluminum (DISPOSABLE) baking tray. 

3) Wet your shirt thorougly with cold water beforehand. This step is crucial-- if you do not soak your shirt in water, the bleach will too quickly oxidize your fabric. This will make the ombre seem disruptive and blotchy... we want a smooth transitioning ombre for that store-bought look (=


4) Proceed to dip your shirt into the bleach tray. At this moment, dip your shirt to the point you want your ombre to go upto... this will be the darkest part of your ombre, because we will leave it in for the shortest amount of time.


5) As in the picture above, take out your shirt a little at a time as you see it begin to lighten. The ombre is visible here. As you can see, the bottom part stays submersed the longest, therefore it is the lightest.

6) Drop it into your washing machine for a quick rinsing ALONE, and dry it in your dryer ALONE. After this initial wash, it may be washed with all your other clothes--the bleach should be removed!

7) This step is optional--grab some studs and really add that finished touch to your shirt! I purchased my studs from eBay for a few dollars.


NOW YOU'RE DONE! Enjoy styling your new shirt!
 
AFTER


TEETH WHITENING DUPE: $1 MIRACLE


Target, Wal-Mart and other drugstores retail this "Teeth Whitening" pen for $10. 
Though it is quite cheap (compared to Crest 3-D Whitening strips that retail for up to $60)
there is an even cheaper alternative! 
And this pen costs only $1
One day as I was browsing the aisle of my local 99 cent store, I stumbled upon the perfect dupe for this $10 pen. Similar in form, tube, and design, it is also similar in composition and quality! 


At first I was quite skeptical about buying a teeth whitening product for $1... would it burn off my teeth? Would it destroy my gums? But for the sake of this blog, I decided to give it a try! 

Like the $10 whitening pen, this pen contains key ingredients of water, hydrogen peroxide, and peppermint essential oils. 

Hydrogen Peroxide (H202) is a strong oxidizer that is usually used as a bleaching or cleansing agent. It is also naturally produced by organisms when they perform specific functions, assuring it is less dangerous than bleach because it is found in all living organisms. 

As seen in this picture, the whitening pen was extremely effective in just 2 weeks' time! 

I even saw immense improvement myself after about two weeks. I got notably more compliments than ever before on my teeth--people were asking me what I used!

-It does not burn my gums
-It does not smell like chemicals
-It works quickly--I use it for 15 minutes at a time
-It's cheap
-Its effective! 

What are you waiting for? These pens are stocked up in your local 99 cent stores, go now!